April 27th, 2019Writing an Extension for Firefox
Sent by Brian Strassberg
One of the best things about Firefox and Thunderbird is that they have a well defined extension mechanism. If there’s some feature you feel is completely missing, you can go ahead and add it. It’s relatively easy to do — you don’t have to fiddle about with a C compiler because extensions are mostly written in a combination of XML and ECMAScript.
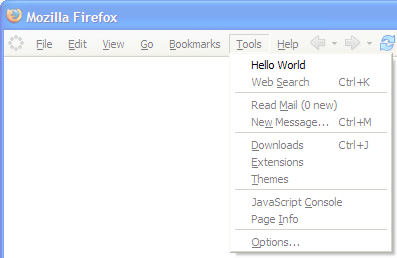
I’ve recently been getting up to speed with the mechanics of writing an extension for Firefox and Thunderbird. I thought it might be a good idea to share what I’m learning in my blog. Hopefully the information might be useful to others trying to learn how to write Mozilla extensions. In this blog, I’ll take a look at installing a really simple extension into Firefox that adds a “Hello World” menu item to the Tools menu.

It doesn’t do anything useful yet, but over subsequent blogs, I’ll introduce more advanced and useful techniques.
Creating contents.rdf
contents.rdf is a Resource Description Framework (RDF) file that describes the contents of an extension. RDF is an XML grammar that provides a data model that can be easily processed by an application. You don’t need to know much about RDF to write simple extensions, but if you’re interested, you can get more information at the W3C.
To get started, create a directory called content. As its name suggests, this will contain the main content of your extension. contents.rdf should live inside this directory. You should end up with a directory structure something like this:
c:myextensions
+- helloworld
   +- content
      +- contents.rdf
Here’s the code for contents.rdf.
<?xml version="1.0"?>
<RDF:RDF xmlns:RDF="http://www.w3.org/1999/02/22-rdf-syntax-ns#"
         xmlns:chrome="http://www.mozilla.org/rdf/chrome#">

  <RDF:Seq about="urn:mozilla:package:root">
    <RDF:li resource="urn:mozilla:package:helloworld“/>
  </RDF:Seq>

  <RDF:Description about=”urn:mozilla:package:helloworld”
    chrome:displayName=”Hello World”
    chrome:author=”Brian Duff”
    chrome:authorURL=”http://modev.dubh.org/helloworld”
    chrome:name=”helloworld”
    chrome:extension=”true”
    chrome:description=”A simple demonstration firefox extension.“>
  </RDF:Description>

  <RDF:Seq about=”urn:mozilla:overlays”>
    <RDF:li resource=”chrome://browser/content/browser.xul”/>
  </RDF:Seq>

  <RDF:Seq about=”chrome://browser/content/browser.xul”>
    <RDF:li>chrome://helloworld/content/helloworld-Overlay.xul</RDF:li>
  </RDF:Seq>

</RDF:RDF>
The important parts of the file (and the parts that would usually change for each extension) have been highlighted in bold. First, we provide a package for our extension. This just distinguishes it from other extensions. For our simple extension, we choose the package helloworld:
<RDF:Seq about="urn:mozilla:package:root">
  <RDF:li resource="urn:mozilla:package:helloworld“/>
</RDF:Seq>
Next, we provide a description of our extension:
<RDF:Description about="urn:mozilla:package:helloworld”
  chrome:displayName=”Hello World”
  chrome:author=”Brian Duff”
  chrome:authorURL=”http://modev.dubh.org/helloworld”
  chrome:name=”helloworld”
  chrome:extension=”true”
  chrome:description=”A simple demonstration firefox extension.“>
</RDF:Description>
Next, we tell mozilla which parts of the product we want to extend. All of the user interface elements of Firefox and Thunderbird are described in a user interface definition language called XUL. Collectively, these user interface components are known as “chrome”. You can extend most of the user visible parts of the two products. In this case, we want to extend the main browser interface of Firefox, defined in chrome://browser/content/browser.xul.
Here’s how:
<RDF:Seq about="urn:mozilla:overlays">
  <RDF:li resource="chrome://browser/content/browser.xul"/>
</RDF:Seq>
Now we’ve described what we want to extend, we have to provide a XUL file that actually installs our custom user interface into the browser window. We will define this later in a separate XML file called helloworld-Overlay.xul. We must tell mozilla where this file is and what it extends:
<RDF:Seq about="chrome://browser/content/browser.xul">
  <RDF:li>chrome://helloworld/content/helloworld-Overlay.xul</RDF:li>
</RDF:Seq>
We’ve completed the first step of creating an extension. The next task is to describe the user interface elements we want to install into the main window.
Overlaying User Interface Elements
XUL is the XML User interface Language. XUL provides a mechanism called dynamic overlays that allows you to modify the user interface elements of a window or control without having to modify the original XUL files. This way, the definition of extension user interface is de-coupled from the XUL files used to define the main interface elements in Firefox and Thunderbird.
We start of by creating helloworld-Overlay.xul. This should live in the same directory as contents.rdf.
<?xml version="1.0"?>

<overlay id="helloworldOverlay"
  xmlns="http://www.mozilla.org/keymaster/gatekeeper/there.is.only.xul">

  <menupopup id="menu_ToolsPopup">
    <menuitem label="Hello World" position="1" />
  </menupopup>

</overlay>
This simple overlay installs a “Hello World” menu item at the top of the Tools menu. Our menu item is defined inside a menupopup element. In XUL, a menupopup represents a container of menu items, for example a popup menu or the drop down of a main menu. Here, we put our item inside a menupopup with the id menu_ToolsPopup. This id, menu_ToolsPopup, is a predefined in browser.xul and corresponds to the drop down part of the Tools menu.
Creating an Install Manifest
Recent versions of Firefox and Thunderbird have a new extension manager which can be used to easily install and manage extensions. To tell this extension manager about your extension, you must write another RDF file called install.rdf. This file should be at the same level in the directory tree as the contents directory, i.e. you should have a structure like this:
c:myextensions
+- helloworld
   +- install.rdf
   +- content
      +- contents.rdf
      +- helloworld-Overlay.xul
Here’s the code for the install manifest with the interesting parts highlighted:
<?xml version="1.0"?>

<RDF xmlns="http://www.w3.org/1999/02/22-rdf-syntax-ns#"
   xmlns:em="http://www.mozilla.org/2004/em-rdf#">

  <Description about="urn:mozilla:install-manifest">

    <em:name>Hello World</em:name>
    <em:id>{12a1584b-2123-473d-8752-e82e74e3cb1b}</em:id>
    <em:version>0.1</em:version>

    <em:targetApplication>
      <Description>
        <em:id>{ec8030f7-c20a-464f-9b0e-13a3a9e97384}</em:id>
        <em:minVersion>0.9</em:minVersion>
        <em:maxVersion>1.0</em:maxVersion>
      </Description>
    </em:targetApplication>

    <em:file>
      <Description about=”urn:mozilla:extension:file:helloworld.jar“>
        <em:package>content/</em:package>
      </Description>
    </em:file>

  </Description>

</RDF>
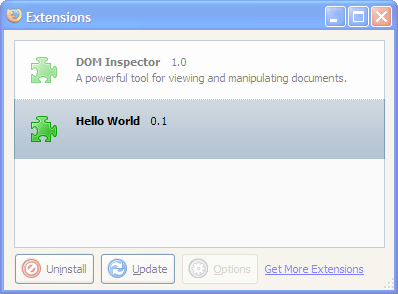
First, we provide a description of the extension. This information will be displayed in Firefox’s extension manager:
<em:name>Hello World</em:name>
<em:id>{12a1584b-2123-473d-8752-e82e74e3cb1b}</em:id>
<em:version>0.1</em:version>
The content of the em:id element is a globally unique identifier (GUID). This is used to distinguish your extension from every other extension. When writing your own extensions, you should aways generate a new GUID for each distinct extension you write. Andy Hoskinson provides a GUID generator web service you can use for this.
Next, we describe which application we are extending:
<em:targetApplication>
  <Description>
    <em:id>{ec8030f7-c20a-464f-9b0e-13a3a9e97384}</em:id>
    <em:minVersion>0.9</em:minVersion>
    <em:maxVersion>1.0</em:maxVersion>
  </Description>
</em:targetApplication>
Each extensible application released by Mozilla has its own GUID: you must specify the correct one here for the application you are extending. In this example, we’re using the GUID for Firefox. We also describe the minimum and maximum versions of Firefox this extension will work with.
Finally, we tell the extension manager which files to install. Later, I’ll describe how we package the extension up so that it can be automatically installed into Firefox:
<em:file>
  <Description about="urn:mozilla:extension:file:helloworld.jar“>
    <em:package>content/</em:package>
  </Description>
</em:file>
Packaging an Extension Installer
Our extension is now complete. But to make it easy for users to install the extension, we should package it up in such a way that Firefox can install it easily. To do this, we bundle our files up into an XPI (Cross platform installer) file. An XPI file is just a normal zip file with files organized in a special way. Our XPI file should contain the following structure:
helloworld.xpi
+- install.rdf
+- chrome/
   +- helloworld.jar
helloworld.jar is another zip file containing all the files we created in the content directory:
helloworld.jar
  +- content/
     +- contents.rdf
     +- helloworld-Overlay.xul
You can easily use this information to create helloworld.xpi using your favorite zip tool. Alternatively, you can use a build utility like Ant to assemble the files correctly. Here’s an example Ant buildfile I used:
<?xml version="1.0"?>

<project name="helloworld" default="createxpi">

  <target name="createjar">
    <zip destfile="helloworld.jar" basedir="."
         includes="content/**" />
  </target>

  <target name="createxpi" depends="createjar">
    <zip destfile="helloworld.xpi">
      <zipfileset dir="." includes="helloworld.jar"
                  prefix="chrome" />
           <zipfileset dir="." includes="install.rdf" />
         </zip>
  </target>

</project>
If you create this buildfile named build.xml and place it at the same level as install.rdf, you will be able to just run ant in this directory to generate your .xpi. Once you have an .xpi file, it can be easily installed using File->Open… in Firefox.

Download the source code (24KB ZIP file).
Links:
Top 10 Firefox Extensions to Improve your Productivity
Top Firefox 2 config tweaks
20 must-have Firefox extensions
How to Make Firefox Look Exactly Like Internet Explorer